Today in this blog post, we are going to look at how to use session storage in React JS with an example. Session storage allows us to store data in key/value pairs in the browser.
The data which we save in session storage will only be persisted in the current browser tab. If we close the current tab or browser window, the saved data in session storage will be cleared.
And the data or values which we store in session storage should be in string format.
To store data like objects, we need to convert objects to string format using JSON.stringify() method before storing the data. While retrieving the data we can use JSON.parse() method to convert it back to an object.
Let’s see how to use session storage with an example. In our example, we will be performing save, read, and delete operating on session storage.
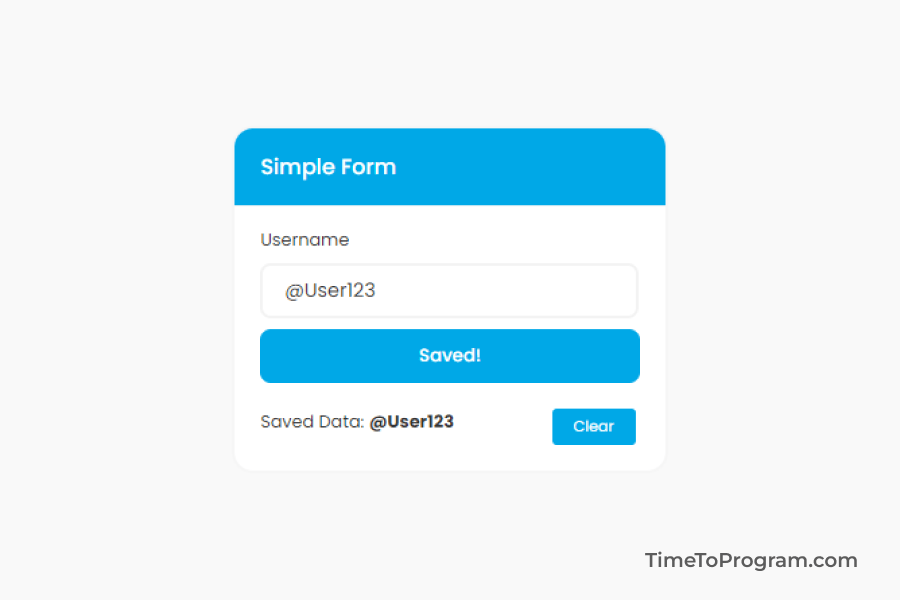
Now let’s create a simple form with an input element to enter a username and a submit button. We will store the user-entered username in our session store.
import React, { useState } from "react";

function App() {
  const [username, setUsername] = useState("");
  const [isSaved, setIsSaved] = useState(false);
  const [isCleared, setIsCleared] = useState(false);

  return (
    <div className="container">
      <div className="card">
        <div className="card-header">
          <h4 className="title">Simple Form</h4>
        </div>

        <div className="card-body">
          <p className="label">Username</p>
          <input
            type="text"
            value={username}
            onChange={({ target }) => {
              setUsername(target.value);
            }}
            placeholder="Enter Username"
            className="text-input"
          />

          <button onClick={()=>{}} className="btn">
            {isSaved ? "Saved!" : "SUBMIT"}
          </button>

          <div className="inrow">
            <p className="label">
              Saved Data:
            </p>

            <button onClick={()=>{}} className="btn-small">
              {isCleared ? "Removed!" : "Clear"}
            </button>
          </div>
        </div>
      </div>
    </div>
  );
}

export default App;
1 Saving data into Session Storage
To store the username in session storage, we have written the saveData() function. In this function, we are using the ‘sessionStorage.setItem()’ method to store the data. This method takes two parameters ‘key’ and ‘value’.
const saveData = () => {
    //saving username to session storage
    sessionStorage.setItem("name", username);

    setIsSaved(true);
    setTimeout(() => {
      setIsSaved(false);
    }, 2000);
  };
The ‘key’ can be of any string, in our case we are using the ‘name’ string as the ‘key’. And the ‘value’ will be the actual data that needs to be stored in session storage.
After saving the data in session storage, we are changing the button text from ‘SUBMIT’ to ‘Saved!’ for 2 seconds and setting it back to ‘SUBMIT’.
2. Read data from Session Storage
To retrieve the data from the session storage, we are using the ‘sessionStorage.getItem()’ method. This method will take the ‘key’ as a parameter and returns the value that’s associated with that key.
const getSessionData = () => {
    //fetching username from sesstion storage
    return sessionStorage.getItem("name");
  };
3. Remove data from Session Storage
For removing the data from the storage, we will use the ‘sessionStorage.removeItem()’ method. This method takes the ‘key’ as a parameter and removes data from the session storage.
const clearSessionData = () => {
    //Removing username from sesstion storage
    sessionStorage.removeItem("name");

    setIsCleared(true);
    setTimeout(() => {
      setIsCleared(false);
    }, 2000);
  };
4. Clear all the data from Session Storage
If we want to remove all the values in the session storage, we can use the ‘sessionStorage.clear()’ method to do that.
Also check out:
Output