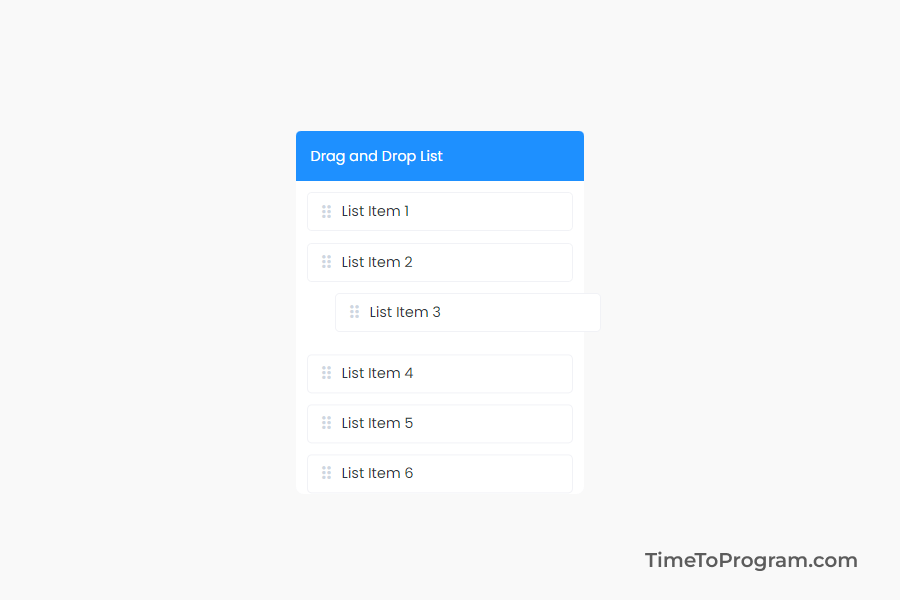
In this blog post, we will look at how to implement a drag and drop list in react js. In this example, we will display a list of items where users can drag and drop the list item within the container.
To create a drag and drop list in react js, we are going to use a library called react-beautiful-dnd. This library will allow us to implement the drag and drop functionality.
Steps to Create a Simple Drag and Drop List in React JS
- Install react-beautiful-dnd library
- Implementing Drag and Drop list using the library
- Updating the item list onDragEnd
1. Install react-beautiful-dnd Library
Let’s first install the react-beautiful-dnd package using the following npm command.
npm i react-beautiful-dnd2. Implementing a Drag and Drop list using the library
After installing the library successfully, let’s define a state variable to store our list items.
const dataList = [
  { id: "1", label: "List Item 1" },
  { id: "2", label: "List Item 2" },
  { id: "3", label: "List Item 3" },
  { id: "4", label: "List Item 4" },
  { id: "5", label: "List Item 5" },
  { id: "6", label: "List Item 6" },
];
const [dragDropList, setDragDropList] = useState(dataList);
we have a constant variable ‘dataList’ which contains a list of items. And we are assigning ‘dataList’ to a useState variable ‘dragDropList’.
Here is the JSX code to create our drag and drop list in React JS.
<DragDropContext onDragEnd={onDragComplete}>
  <Droppable droppableId="drag-drop-list">
    {(provided, snapshot) => (
      <div
        className="drag-drop-list-container"
        {...provided.droppableProps}
        ref={provided.innerRef}
      >
        {dragDropList.map((item, index) => (
          <Draggable key={item.id} draggableId={item.label} index={index}>
            {(provided) => (
              <div
                className="item-card"
                ref={provided.innerRef}
                {...provided.draggableProps}
                {...provided.dragHandleProps}
              >
                <span className="material-symbols-outlined">
                  drag_indicator
                </span>
                <p className="label">{item.label}</p>
              </div>
            )}
          </Draggable>
        ))}
        {provided.placeholder}
      </div>
    )}
  </Droppable>
</DragDropContext>;
In the above code, we are using the DragDropContext, Droppable, and Draggable to implement the drag and drop list.
‘DragDropContext’ will wrap around the area where we want to drag and drop the list items. It also provides the ‘onDragEnd’ callback, which we can use to manage the list data.
The onDropEnd callback will be triggered whenever the drag event is completed.
We are using the <Droppable /> component to create a droppable area, where the items can be dropped. It takes ‘droppableId’ as a required prop and it should be a unique id.
In between the Droppable opening and closing tag, we have a function that passes provided and snapshot argument.
<div
className="drag-drop-list-container"
      {...provided.droppableProps}
      ref={provided.innerRef}
>
We are passing ‘provided.droppableProps’ props to our item list container and also creating a reference ‘provided.innerRef’ so that the library can access the element.
Finally, we have the ‘Draggable’ component, which is very similar to the Droppable component. We need to wrap Draggable to every list item and we are passing ‘draggableId’ and ‘index’ to the Draggable components to ensure the drag functionality works fine.
Also check out:
<div
  className="item-card"
  ref={provided.innerRef}
  {...provided.draggableProps}
  {...provided.dragHandleProps}
>
We are also creating a reference ‘provided.innerRef’ and passing ‘provided.draggableProps’ and ‘provided dragHandleProps’ props to our list Items.
3. Updating the item list onDragEnd
Now after each and every drag and drop of the element, we need to update our list item position. So to do that, we are using onDragEnd callback props on DragDropContext. This callback will be triggered whenever the dragging is completed.
We have written the onDragcomplete() function to update the list item position after the dragging is completed.
const onDragComplete = (result) => {
    if (!result.destination) return;

    const arr = [...dragDropList];

    //Changing the position of Array element
    let removedItem = arr.splice(result.source.index, 1)[0];
    arr.splice(result.destination.index, 0, removedItem);

    //Updating the list
    setDragDropList(arr);
  };
First, we are checking whether the element is dropped outside of the drop container or not. If true we will not perform any operation.
If the element is dropped inside the container, we are updating the position of dragged element inside our list using Array.splice() method. And assigning the new array to our ‘dragDropList’ state variable.
4. Output