
In this short tutorial, we will learn how to create an automatic image slider using HTML CSS and javascript. Image slider will be the best way to showcase images and videos where we present one image or video at a time to the user.
For changing the content of the image slider users can click on the next or previous button. But in this tutorial, we will not implement the next and previous button functionality. Instead, we change the content of the image slider every 5 seconds.
Create Automatic Image Slider using Html CSS and Javascript
As you can see in the above demo video, we have our simple image slider and we are changing the content of our image slider with a delay of 5 seconds.
1. Creating UI for Image Slider
To begin with, let’s write the HTML code for our image slider.
index.html

<!DOCTYPE html>
<html lang="en">
  <head>
    <meta charset="UTF-8" />
    <meta http-equiv="X-UA-Compatible" content="IE=edge" />
    <meta name="viewport" content="width=device-width, initial-scale=1.0" />

    <link rel="stylesheet" href="style.css" />
    <title>Automatic Image Slider</title>
  </head>
  <body>
    <h4>Automatic Image Slider</h4>

    <div class="slider">
      <ul>
        <li><img src="/img1.jpg" alt="image one" /></li>
        <li><img src="/img2.jpg" alt="image two" /></li>
        <li><img src="/img3.jpg" alt="image three" /></li>
        <li><img src="/img4.jpg" alt="image four" /></li>
      </ul>
    </div>

    <div class="pagination-dots">
      <span class="dot active"></span>
      <span class="dot"></span>
      <span class="dot"></span>
      <span class="dot"></span>
    </div>

    <script src="script.js"></script>
  </body>
</html>
Here we have taken a div element with the class name ‘slider’ and added the list of images using <ul> and <li> tags. And our HTML code is done.
2. Make the Image Slider Look Good using CSS
Now let’s write some CSS code to make our image slider look beautiful.
styles.css

body {
  width: 100vw;
  height: 100vh;
  display: flex;
  flex-direction: column;
  align-items: center;
  justify-content: center;
  background-color: #fbfbfb;
}

h4 {
  font-size: 26px;
  font-weight: 600;
  color: #adadad;
  margin-bottom: 30px;
}

ul {
  display: flex;
  list-style: none;
  transition: all 1s ease;
}

.slider {
  width: 550px;
  height: 350px;
  overflow: hidden;
  border-radius: 3px;
  box-shadow: 3px 20px 15px 0px rgba(0, 0, 0, 0.15);
}

img {
  width: 550px;
  height: 350px;
  border-radius: 3px;
}

.pagination-dots {
  display: flex;
  align-items: center;
  gap: 10px;
  margin-top: 40px;
}

.dot {
  width: 20px;
  height: 6px;
  border-radius: 5px;
  background-color: #d6d6d6;
}

.dot.active {
  background-color: #fe6a5c;
}
In the above CSS code, we are using flexbox properties on the <ul> tag to display images horizontally.
We have added the same width and height for the `img` tags and .slider class. Also added overflow: hidden on the .slider class so that we only display one image at a time.
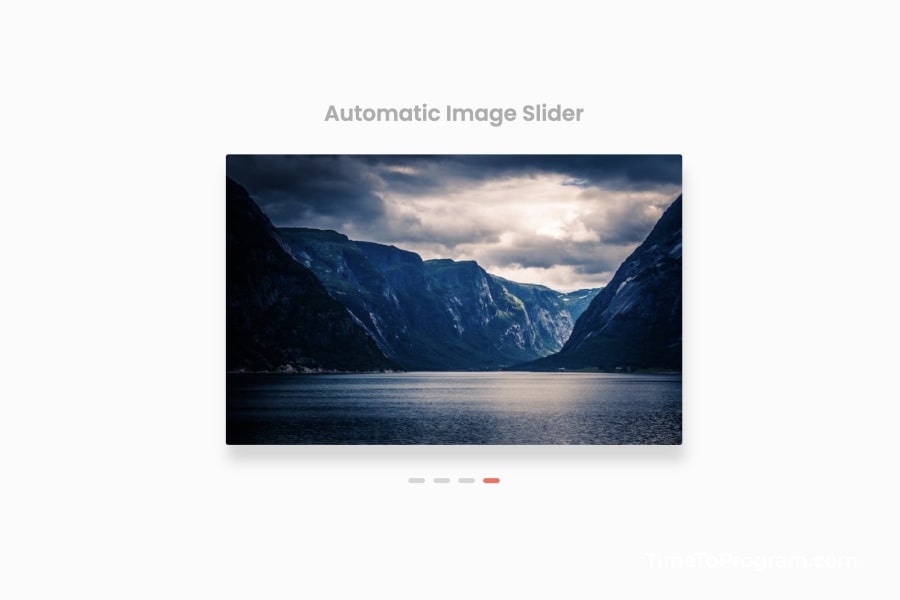
Our image slider looks like this after adding styles to it.
3. Implement Image Sliding Functionality
Finally, let’s write some javascript code to make our image slider work as we expected.
script.js

let currentSlide = 0;

function startSlider() {
  let imageCount = document.querySelectorAll("img");
  let images = document.querySelector("ul");

  if (imageCount.length === 0) {
    imageCount = document.querySelectorAll("img");
    images.style.transform = `translateX(0px)`;
    return;
  }

  images.style.transform = `translateX(-${currentSlide * 550}px)`;

  // Remove the active class from all dots
  let dots = document.querySelectorAll(".dot");
  dots.forEach((dot) => {
    dot.classList.remove("active");
  });

  // Add the active class to the current dot
  dots[currentSlide].classList.add("active");

  if (currentSlide === imageCount.length - 1) {
    currentSlide = 0;
  } else {
    currentSlide++;
  }
}

setInterval(() => {
  startSlider();
}, 3000);
In the above javascript code, we have declared a variable currentSlide and initialized it to 0. It will hold the current image position.
Inside the startSlider() function, we have written the logic for the automatic image slider. Firstly, we get the total image count and store it in the imageCount variable.
We are checking If the imageCount value is equal to 0 which means we have reached the last image in the list and we reset the imageCount value.
If imageCount is not equal to 0, then we translate the whole image list to the left using `translateX(-${currentSlide * 450}px)`.
If the currentSlide value is equal to the imageCount length – 1 then we set currentSlider to 0 or else we increment the currentSlider value by 1.
And lastly, we are using the setInterval() method to invoke the startSlider() function repeatedly with a delay of 5 seconds.
Also check out: